Friday, July 12, 2013

Fruit Fly Trap That Works

Summer brings a ton of fresh fruit ripe, yummy and available for quick snacks or desserts in my household. Along with that, just like tons of others, it brings science class's best genetics lesson models, the fruit fly. While in science class they were invaluable (and I loved that section), here they are a nuisance. The answer is simple right? A tablespoon or so of apple cider vinegar, water and just a drop of dish soap and set the jar out, or cover with plastic wrap. I did the one with the open jar first because I didn't come across the covered part til later. While I caught a few, I seemed to just be adding one more food source to their meal. I was certain that was because I make my own dish soap  it wasn't breaking the surface tension. Off to the store I went and bought a little thing of dish soap. Nope, I felt like an idiot that I couldn't make this "miracle trap" work. So? Try plastic wrap... Yeah, it's summer, so I ended up with a nice science project ON TOP of the science project models. 


I'm just trying to help with this because I'm guessing I am not the only one who hasn't had some of the issues listed above. I found using a coffee filter poked with holes has made my kitchen science model free.  I don't even measure, just pour enough apple cider vinegar to cover the bottom of my canning jar, filled with water and added a drop of my homemade dish soap. Then I covered my trap with a paper coffee filter, poked with a few holes with a toothpick and YEA!!! I set it out right by the fruit behind my "decorative" infusing vinegars (it sits where you dont even notice it) and showed my husband my brilliant solution to our annoying problem. He was wonderful and gave me that "oh, you are so cute" smile and congratulated me. Ah, whatever, I took it because I had finally beat the beast (ok size of a pin head isn't a beast but this is my blog, I had them EVERYWHERE). 


Maybe I'm the only one with this issue, but if I'm not, I do hope this helps the next poor sap just trying to rid themselves of the oh so strangely cute, but irritating fruit fly. 

Thursday, July 11, 2013

Fall Expansion


So this fall I plan to expand the urban farm. I can't even BEGIN to tell you how excited I am to do that. This spring's expansion made a world of difference in making our little back yard, it looks like a whole new place. With the plans I have for this expansion, it will allow me to grow enough that I should be able to have a good "crop" big enough to actually take and start cutting down on some of the produce bills. Sustainability is a goal any urban farmer is looking to do, Right?


I have learned a lot about growing out here and now with the new area I have a better idea of where my plants grow the best in my yard. A learning curve has been established. I found the perfect place to have tomatoes in 2 areas of my yard and now I just need to make sure the one I plan for next year will work the best for harvesting them. This year I found that having them near the chicken coop just isn't working for me. So along the side of the house in my narrow garden they will go! There are other plants I have that I will need to move to make room in certain beds and my mind whirls as I wake up thinking about all this.... I have to say gardening and transforming our back yard into a virtual urban farm has become a great break for me from all the hub bub of what life brings. I seriously think all stressed out people need to really find gardening. 

I love the challenge of finding space and making spaces to add just "one more place" to plant. Experimenting with so many ideas and deciding what I want to grow and what I can use in everyday cooking is fun. I've added herbal medicines to my repertoire and so now I need to start growing and drying my own herbs, I mean how much easier would it be to just grab the herbs I need (with no outragous shipping prices!) for a tincture or lotion, soap or... and lets not forget about cleaning and... Oh YES, so much and yet, *sigh* back to my original path. 


This fall, since my kiddos are getting older, I am taking their toy storage/mud fun/catch all area and adding another planter that will have raised areas to hold some of my shorter plants and yet still leaves me enough room to grow in the lower area. As you can see, with urban farming eyes of course, there is a whole wall just waiting to be host to my raised bed! Here in the southwest the early fall/early winter time is a great time to put in plants that enjoy cooler temps. I plan to make a PVC pipe frame for all my raised beds, then cover them to make a green house type environment so I can extend my season even further. My hope and goal (and quite honestly, now just a pure challenge) is to grow all year and have a good harvest throughout. Seriously, some days I think I may need help with as much as I plot and plan and dream about what I can do with all this. 

My plan is to have the new bed built in August while the kiddos are on one of their breaks so they can continue to be an active part in the process. There will be some more planters set out around the yard so I can have designated herbs growing in each. I WILL build this urban farm to be a place where I can grow healthy food for my family, provide eggs and get the herbs I use in all my various uses by next year. I want to show you don't need a huge amount of land to sustain yourself. Just time, hard work and a little imagination and vision to see what potentially can be.

All of life should be as fun, challenging and rewarding as a garden, don't you think??


Monday, July 8, 2013

Getting Ready For School Start, Beyond The Supplies

With the start of school less than one week away here I am gearing up for a good start. Of course school supplies are on the list, but this I am waiting to do that until they actually start. Yes, my kids go to school, my best friend homeschools and she is my hero. She has schedules made, oh my gosh she is so patient and her children are so incredibly smart. Through out the school year I make sure to get ideas from her to do fun activities with my kids to help them with skills they need help with. My children have more learning issues, unfortunately, than I am able to deal with so I do rely on trained teachers that I very much appreciate to teach my children. Which brings me back to every year the teachers send home personal lists that they need for their class, so lesson learned to just wait. There are other things that I make sure to do before that though. It's so much easier when I do a few things to make sure I am ready. 


Snacks - Most of my kiddos are young enough that snacks are still done in their grades. I try hard to make sure that my children have healthy snacks that fit the "nut free" atmosphere in schools now. For those of us that have those classrooms you know that can sometimes be a challenge when your house is not "nut free" from the start. So if I make them ahead of time I have them ready and I know that all the ingredients are fresh and not processed. 

Here is what my year is starting out with. I take a couple days to make these the week before so this is my week!

Fruit Leather - the recipe is basically the same as all those out there but I use honey instead of sugar and don't simmer mine, just warm enough to mix honey in easier. I made vanilla strawberry roll ups and a mixed berry with shredded unsweetened coconut for a little fun texture and flavor. Next month I will make pumpkin applesauce and sweet potato applesauce fruit leathers for fall. It's easy being I have my pumpkins from the garden already processed into puree, applesauce is made frequently, being I buy apples by the case, and we eat a ton of sweet potatoes so always have those on hand. :)

Banana Muffins (gluten free even)

Applesauce (no added sugar) in squeezy containers, I found the BooginHead Squeeze'Ems reusable food pouches to work the best because the lids are secured on. I love the size and how easily 'Yummi Pouches' can be filled but those don't have caps that are secured and my kids get sidetracked far too easily to remember them. 

Wholly Guacamole  and sprouted chips (Way Better Snacks brand) - yes, this one I buy. 

Maple Pecan Granola, I just don't add the pecans if they have nut free classrooms. This also makes a great addition to our yogurt in the morning. 

So this should be a good start for snacks...


Frozen dinners - I make sure to pre make a few frozen dinners along with other quick means to make other dinners with less hassle. I have to admit the first week usually includes a lot of raw veggies and fruits with dinners as "fillers" to keep things easy so most times I just add some protein or other main dish to go with whatever veggies/fruits I have on hand. I do have a few dinners set for easy "grab and go" convenience and potentially (depending on how hungry the family is) leftovers to be divided and used for lunches as a bonus. Here are a few that I use to start. 

4 lb Meat loafs, this year I made 2 being I had all the stuff out and set. Sadly, usually not a lot left of these to use for lunches the next day. I can sometimes get enough that I can use in my husband's lunch. 

15x11x2 Veggie Lasagna, this one I will definitely have some perfect left overs to be portioned and put into ziplock lunch containers. Then I just pull them, add stuff I have to go with that and send. It stays frozen usually until time to eat. My husband loves these leftovers for work that can be pulled out later and enjoyed days, weeks and months after we have it. This veggie lasagna has no sauce to it being that I let all the ingredients bake and make their own sauce, its a bit lighter which makes it a great lunch meal. I do make one with zuchini strips instead of pasta, but it doesn't work as well made ahead of time because the zuchini breaks down too much before baking the first time. 

Chicken, I buy 4-8 whole chickens from sprouts to have on hand for a quick grab to add to my veggies and fruit on hand. 

Cubed Beef, this works great on days I just want to throw some into a crock pot with veggies and make a quick beef stew. 

Whole Wheat Cheddar Biscuits, while not a main course there are times I use these to accompany meals. (From 100 Days of Real Food)

Whole Wheat Tortillas, these are great to grab and make wraps with. We do lettuce wraps but sometime we like to change that up with using tortillas. Again, very quick and healthy meal and if these are made all I have to do is add some chicken, veggies and wrap.(Again, from 100 Days of Real Food)

5 lbs. of taco meat - my family LOVES a taco night or just having taco salads, having this premade and put into a container that I can grab and put into a pan to warm is a bunch of time saved. 

Marinated chicken or steaks in vacuum sealed containers helps to cut down on time. I just grab what I need, thaw and cook. I have the food saver that has the marinade function that really helps in getting this one set faster. 


Lotions, Lip Balm and "Hanitizer" - I have 2 children that have beautiful brown skin that becomes HORRIBLY dry out here in the desert. When you add the constant hand washing and hand santitizer that gets pushed on them it gets worse. On the other hand my little white boy gets terribly dry lips that his tongue just can't wait to make red, swollen, dry and cracked ALL the way around his mouth down to his chin. SO, I make sure to make some portable lotion and lip balm that tastes like Burt's Bees brand lip balm to send with all of them. I know they love using it, and so there is never an issue that this is a waste of time to make all this solely for school. I always make enough that I have some on hand for when the kiddos run out or, well, lose them (that usually happens before they run out). The "hanitizer" (my princess has called it that and so now that's become a family word for hand sanitizer) is just basically to appease the teachers. I can't stand that they use that as a substitute for hand washing. This year I am sending a note with my kids just asking politely for them to be able to wash their hands with soap and water and not use the hand sanitizer, if hand sanitizer is needed they have there own alcohol free, triclosin free "hanitizer" all set to use. I will do a seperate post later of the recipes I use for this section. 

One week before school and I am set for the start... Once I get the school lists I do make sure that I always grab more than what's listed. That gets a bit expensive, but running into the kid's teachers every year buying extra supplies definitely makes it worth it. I can not tell you the respect I have for teachers, all the planning, prep work and supplies bought out of their own funds (This goes equally for homeschool moms!!). So we make sure to help bless our teachers with some extras to help them to have what they need. 

I hope this helps others gear up for the big first day of school! 

How To Help Ease Laryngitis


Laryngitis, like any inflammation, can be painful and just down right annoying. Obviously knowing what a problem is helps you to determine what to use to help it. Laryngitis is when your larynx (voice box) becomes inflamed, swollen and irritated. It's actually the swelling around your vocal cords that produces the distortion of your voice and when we start identifying it as laryngitis. While this rarely causes of a total annoyance for adults, in children it can cause complications such as croup (a swelling of the throat that narrows airways and causes that notable "barking" cough). Chronic hoarseness can be something more serious and you should be seen by a physician. 

Why this post? Well, baby came up last night and had found his voice had changed. While he thought it was "fun" and "hilarious", I cringed a little. I have been blessed with children that rarely get sick.  So when one comes down with something I generally have to use stuff I can make. I knew he had been having some allergy issues and so this wasn't a total surprise. I was ready this time. In preparation for the cold season this past winter I had made some honey, lemon, ginger root tea base and placed it in the fridge ready for a rough cold and flu season. Well? My kiddos never got it, bonus now because it works great for treating laryngitis. 


This "tea" is so easy to make and there are different variations all over the web on it. I make mine slightly stronger than what I have seen out there but it's an old oriental herbal remedy that has been passed down for ages. If you want ideas for different additions to this base remedy there are plenty out there, from thyme, to cayenne pepper, to you name it. Being I generally use this for my children I try to stay away from the "spicy" hotter herbs. Once you have the base you can keep it in the fridge for months. I generally use mine within a year before I make a new batch. Obvious if it looks or smells off I don't use it and others say they only keep theirs for 3-4 months. 


There are only 3 ingredients in mine; local raw honey, fresh lemons and fresh ginger root. Honey is the biggest part and most beneficial when you have a cold, or in this case laryngitis. It's wonderful at soothing sore, irritated throats due to its astringent properties. In fact, a spoonful several times a day can help laryngitis and soothe the raw irritation that comes with it and help with the inflammation. Raw honey has natural anti-viral, anti-bacterial,  and anti-fungal properties, all things that can help fight those nasty bugs at the root cause. Lemon's acidic nature helps kill bacteria and give relief to some of the symptoms of laryngitis. You can also take lemon, a pinch of salt and add that to warm water to gargle throughout the day. Lemon is a great mucus fighter, while you may not have that with the laryngitis, for colds it definitely helps. Ginger is a natural anti-inflammatory and antibacterial, again all things to help combat those germs that are causing the problem. In addition to this, you can add 1 tablespoon of apple cider vinegar to help increase the bacterial fighting qualities. Being this tea already has a strong acidic taste, usually the apple cider vinegar isn't noticed at all (for kiddos/hubbies like mine that don't like the taste or smell). 


To make I usually use a pint jar and add 3-4 tablespoons of fresh squeezed lemon, then I take one more lemon and cut it into slices and add it to the bottom of the jar. I take the leftover peels from the juiced lemons and use it to boost some vinegar for cleaning. Grate 2-3 inches of fresh ginger (sometimes a bit more) on top of the lemon peel and cover with honey. Yup, thats it. I set mine out for 3-4 days and shake it a few times a day to get all the ingredients mixed. At room temperature it obviously makes the honey softer to you can fully incorporate everything. Then I pop it in the fridge and let it set for about a week before I use it, unless someone needs it sooner then you can use it right away. To use I put 2-3 tablespoons (sometimes more if someone really is having a hard time with their throat being sore) in a cup of WARM water. Remember, once you heat raw honey up past around 110 degrees it is no longer raw and you kill all the beneficial properties of the honey. Also this isn't medicine with harmful chemicals and such, more isn't going to hurt you on this one. Add the optional apple cider vinegar if you want, stir and drink. My kiddos LOVE this tea when they have a cold, my husband has no issues, so it's definitely a winner and easy to get them to drink in my house. This also adds much needed hydration for youngins that tend to not drink as much as they should when not feeling well. As an addition to the tea I make sure to have everyone eats more yogurt and kefir shakes for about 1-2 wks to help boost everyone's immune systems. During the winter I already add vitamin D to the mix and in the summer I make sure everyone gets outside and receives plenty of natural vitamin D from the sun (you can overdose on oral vitamin D but not when it's from the sun). Depending on how bad my kiddos are I will sometimes add a Eucalyptus nebulizer, or steam treatment (just 3-4 drops in a steamy bowl or pot of water) to help clear and add the antibacterial benefits of it. You can add echinacea, although starting later it may be less effective. Depending on where you get your information echinacea works best when used right away.


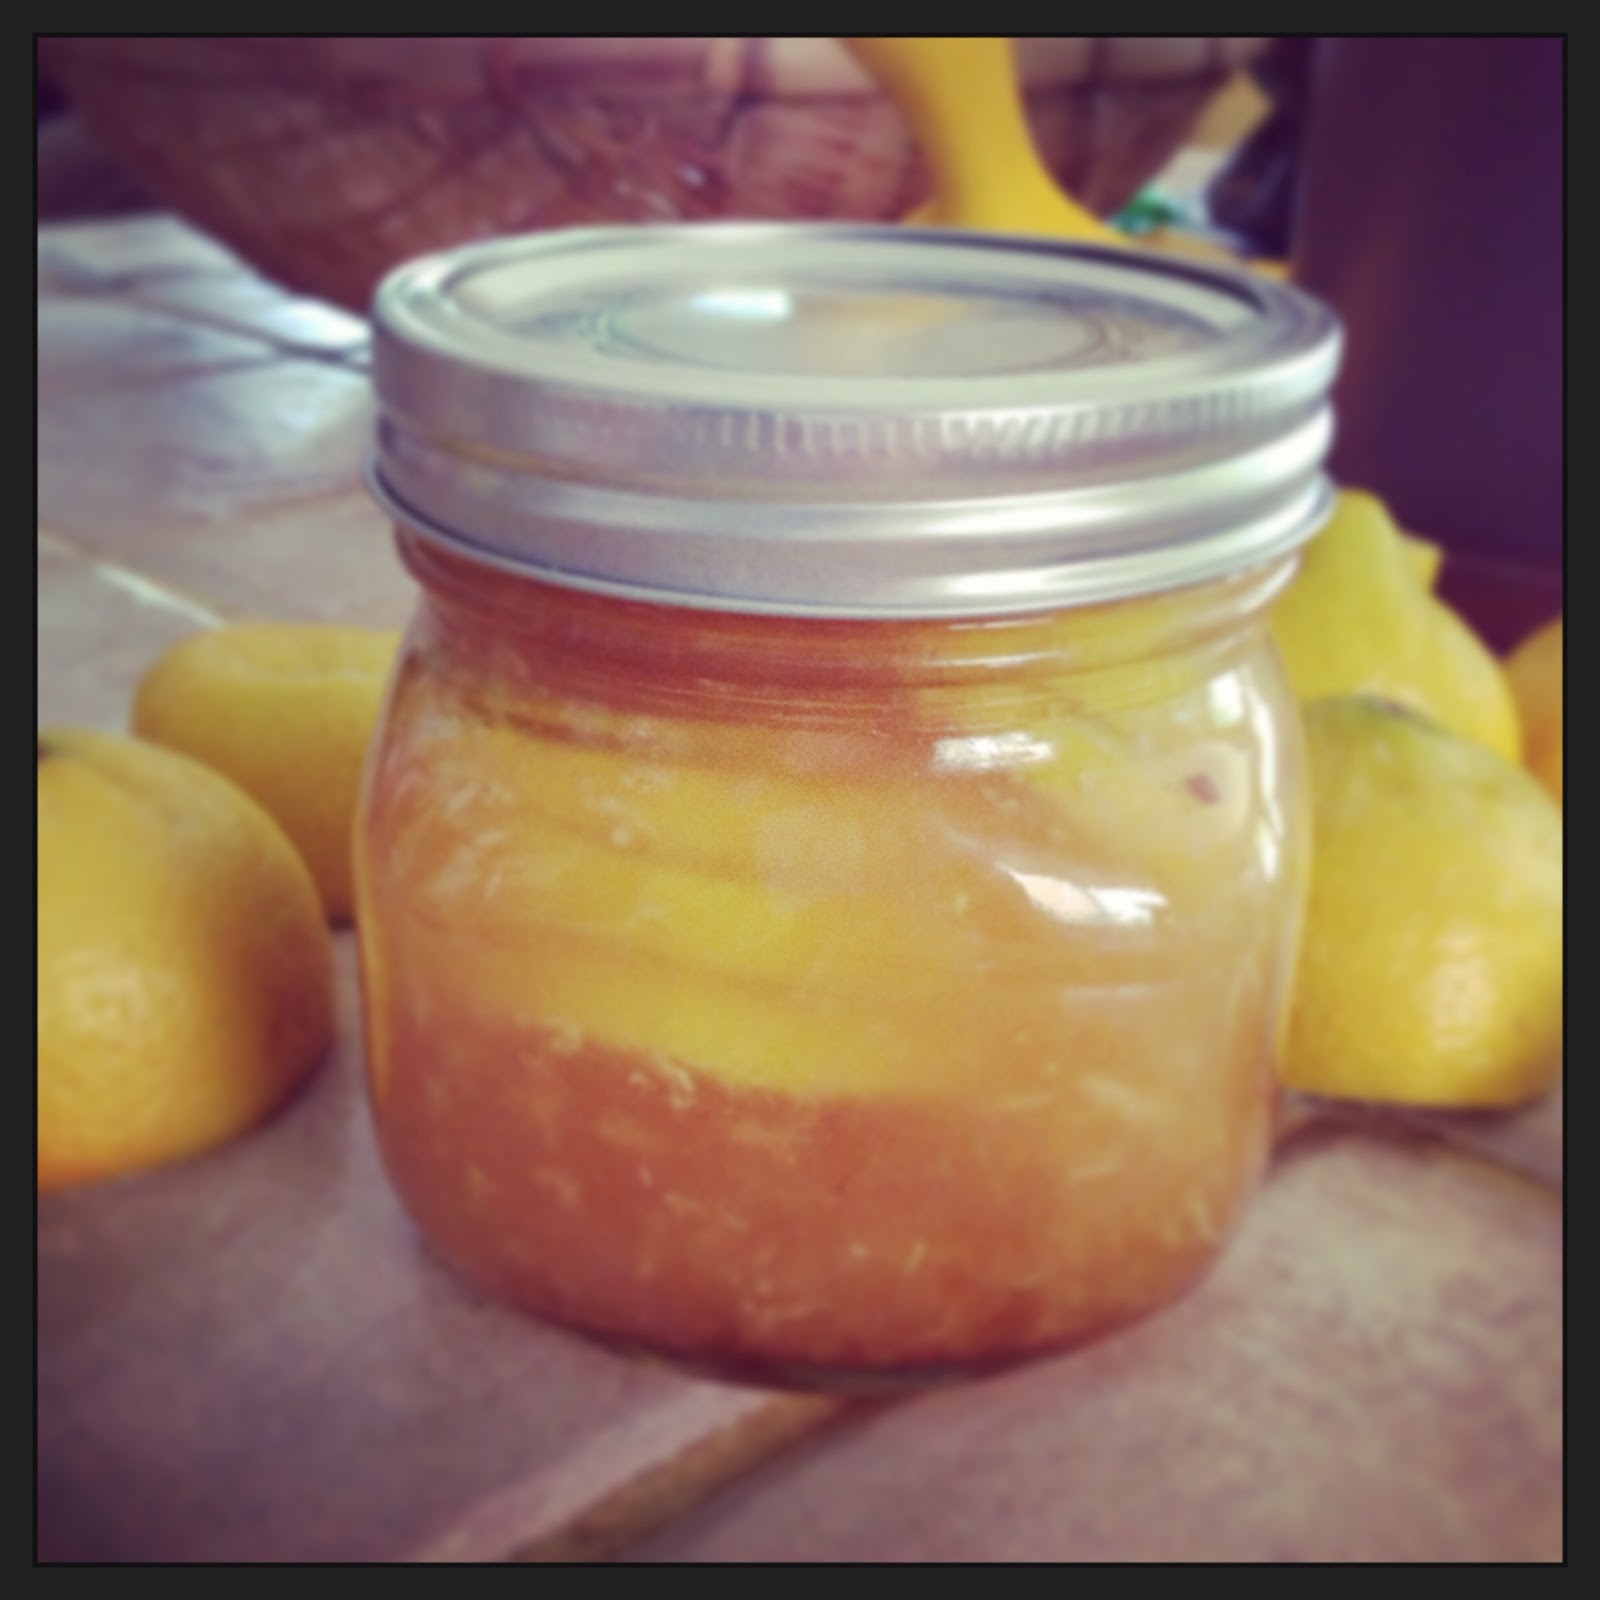
 I love to use this as a get well gift for friends that are battling a cold. It's so easy and with a simple addition of a piece of cloth under the ring of my Kerr or Ball jar it help make it look cute. I hope this helps others as it has done for my family!

For a printable version of the recipe - Honey Lemon Ginger Cold Helper Tea

* Raw honey or any kind of honey should never be given to a child under the age of 1


You can find most of the ingredients in your local health food stores, grocery stores and herbs/essential oils can be found at Mountain Rose Herbs and Rocky Mountain Oils (where I usually get my therapeutic oils, I wanted to have higher quality for anything we use for inhalation). 


Disclaimer: Please understand that this information is for educational purposes only. The statements made here have not been approved by the Food and Drug Administration and they are not intended to diagnose, treat or cure or prevent any disease. Don’t take my word for it…you should always engage conventional wisdom and consult with your medical professional to determine potential drug interactions and safety of use.